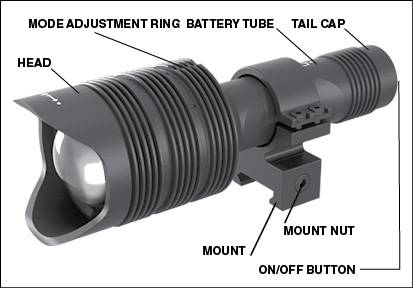
Preparing the Device
![]() Download this manual (.PDF, 1.2 Mb)
Download this manual (.PDF, 1.2 Mb)
1. Introduction
Congratulations on choosing the ATN IR940; an extremely powerful, long range infra-red illuminator that is perfect for the use of night vision for hunters, outdoor enthusiasts, military and law enforcement.
Before using your IR940, please read this manual carefully. Also, refer to the Troubleshooting section for tips with light issues/problems.
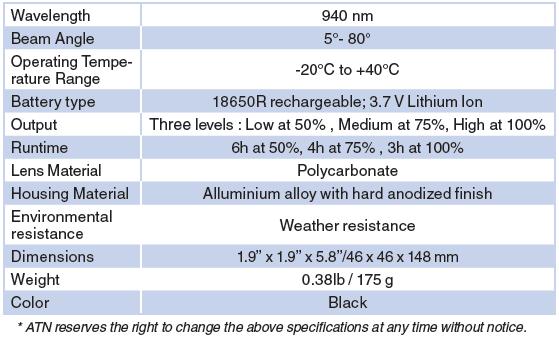
2. Specifications
3. Features
- High power LED emitter.
- Three modes of operation.
- Single lithium 18650 battery with charger.
- Removable grip ring.
- Easy rail mounting system.
- Battery charger.
- One-year Warranty.
NOTE:
Please hold the battery tube (not the brightness control ring or neck) when tightening/loosing the tail-cap.
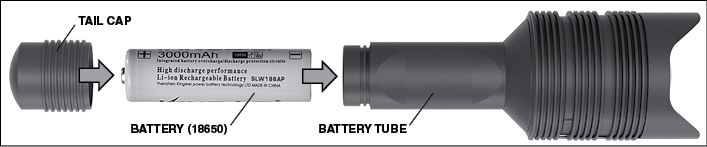
4. Battery
CAUTION
Only use an 18650 battery to operate this light, do not use 2 CR123 batteries as they may damage the device.
The IR940 IR Illuminator uses one 18650 battery.
- Remove the tail cap unscrewing it until it is free of the body.
- Install the battery in the body, observing proper battery polarity.
- Install the tail cap back on the body.
5. Modes
The IR940 has three stage output — Low, Medium and High system. Low at 50%.
Medium at 75%. High at 100%.
6. Focus
The factory preset modes control the brightness of the IR illuminator.
Three modes are designated on the head after the focusing ring. The modes are distinguishable by the size of the dot. The small dot indicates the lowest power output setting. The medium dot indicates the medium output power setting. The large dot indicates the strongest output power setting.
To turn on/off the IR illuminator push the button on the tail cap.
To switch the modes rotate the setting ring behind the focus ring of the IR illuminator.
7. Adjustable mount
Turn the light on maximum output and shine it on a wall 8~10 m away. To focus the beam, hold the head in one hand and turn the neck section with your other hand turn clockwise or counter-clockwise.
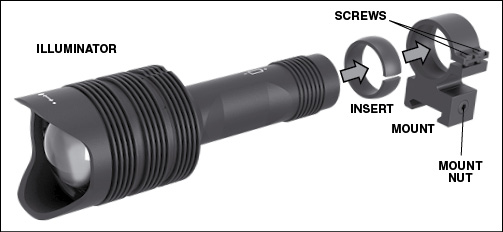
8. Mount
Attach the IR940 to adjustable mount as follows:
- Unscrew the two screws.
- Place the insert in the mount.
- Insert the illuminator into the mount with in sert.
- Secure the two screws using an Allen wrench. Do not apply excessive torque.
9. Aligning the IR beam
In order to Align the IR940 illuminator to your scope. After the IR940 is assembled into the mount. Place it on the X-Sight 5 side accessory rail or on your rifl es accessory Picatinny rail. Once mounted securely, slightly loosen the two screws on top of the mounting ring.
While looking through the X-Sight 5 at night with night mode activated. Move the IR940 around in the mount until you see the IR light covering your entire fi eld of view in the X-Sight 5 view fi nder. Once you have adjusted your IR light to be aligned with your X-Sight 5 FOV, gently tighten the two screws on top of the mounting ring with an Allen wrench.
10. Maintenance
To prevent wear and retain water-resistance it is a good idea to lubricate the threads and o-rings if they become dry.
11. Troubleshooting
Light Doesn’t Turn On
- Check that the battery tube is fully threaded, as well as the tail cap.
Light Dimming
- If the output is declining rapidly unexpectedly, please try another fully charged battery and/or charge your battery and retry.
- If output is not fixed with other charged batteries, please contact ATN for further assistance.