Preparing the Device
![]() Download this manual (.PDF, 1.06 Mb)
Download this manual (.PDF, 1.06 Mb)
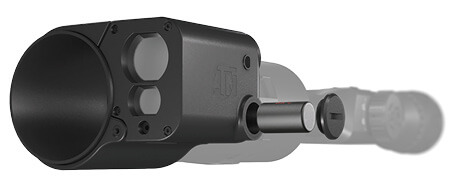
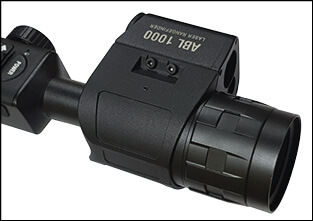
1. Description
The new Auxiliary Ballistic Laser (ABL 1000/1500) will turn your ATN SMART Optic into a precision hunting system. Simple and quick to attach, the ABL Smart Rangefinder takes just minutes to install. Once active, your ATN Smart optics’s internal Ballistic Calculator will make instantaneous adjustments to your reticle to compensate for the change in range to target. You are able to control your ABL SMART Rangefinder controls via your scope. The ABL is compatible with the ATN X-Sight 4K, ThOR 4, and X-Sight II HD series of scopes. The distance to your target will be recorded when your ABL 1000/1500 is in use.
Now, you will be ABL to Make Every Shot Count!
2. Battery installation
You received a CR2 3V battery with your ABL. Remove the clear plastic cover from the battery before use.
Take a coin or flat head screw driver and unscrew the battery cap from the ABL housing. Insert the CR2 battery as shown in the image. Replace the battery cap to the housing and use the same tool to tighten it down.
3. Installation
When mounting the ABL to the X-Sight 4K or Thor 4 you have two mounting options:
- You can mount the ABL to the front objective of the scope using the provided sunshade and adapter rings.
- You can mount the ABL on the body of your scope behind the focus ring.
Option 1
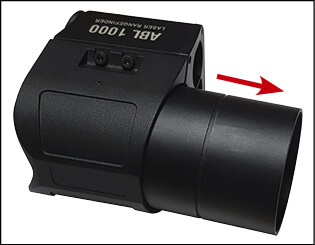
To correctly install the ABL on your ATN Smart Scope, remove all contents from the retail packaging. The box contains several adapter rings you would use to attach to the front objective of your ATN Smart Scope.
Select the correct adapter ring that will screw onto the front objective of the ATN scope you will be using.
Unscrew the two Allen screws from the ABL housing and open the latch. Slide the ABL housing with the latch open over the threaded sleeve, and remove the housing from the sleeve. Use a few drops of lubricant oil on the threads before attaching the adapter ring or the ABL threaded sleeve to your scope.
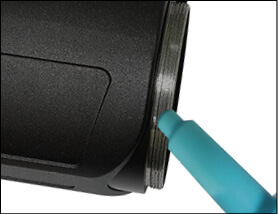
Tighten the adapter ring and/or threaded sleeve snuggly by hand. Re-install the housing on the threaded sleeve, making sure the protruding notch on the inside of the latch aligns with the slot in the threaded sleeve. Close & return the housing latch to its original position. Use the original Allen screws to secure the ABL to the threaded sleeve.
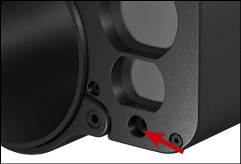
Your device should sit flush to the adapter ring. There should be no movement when you attempt to move the ABL when pulled forward or pushed backward. There is also a small set screws in the center of the ABL housing that can be tightened to add an extra level of retention against constant recoil.
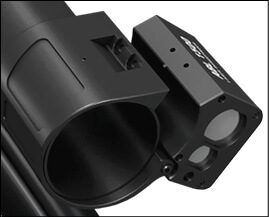
Option 2
- Unscrew allen keys visible in both photos below to unlock the sunshades.
- Take Sunshade out.
- Place the included Tape/Rubber housing protector behind the focus ring on your scope.
- Gently pull from the inside of the ABL cover to slide over the focus ring.
- Find the position that will allow you to both use the allen key wrenches to tighten and the set screw to hold in place. Set screw must be set the entire length down or will not hold properly. This means no movement and a good amount of torque 40-50 in/lb.
This position can be seen in photo above where the ABL is at the back edge of the lens assembly
a. 640 units will have the extra ring at the back
b. 384 units do not have the ring
- Tighten down Set Screws and Allen keys.
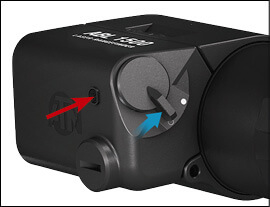
4. Turning the device ON
To turn the device ON, move the toggle switch on the back of the ABL unit to the right. To turn OFF the device, move the toggle switch to the left.
To verify ABL is powered on, open your mobile device and look at the Bluetooth settings. You will see ABL_01 listed as an available device.

5. Pairing the ABL to your Smart Scope
NOTE:
This is a brief overview of the paring process. Please visit ATNCorp.com to download the manual of the optic you are trying to pair for a full step by step instruction with pictures.
Prior to attempting to pair the ABL for the first time and in the event of pairing to a second unit, perform a memory wipe of the ABL to remove any prior pairing logs the unit may contain. To perform this memory wipe, turn the ABL on and hold the Bluetooth button down for 10seconds, the ABL unit is now ready to be paired with your ATN optic.
To pair the ABL Rangefinder with your ATN optic, open your Shortcut Carousel on your SMART HD scope and select the Wrench Icon to begin the process. In the System Settings, navigate and select the Settings option. Using your scope’s controls, select WiFi and Bluetooth by highlighting the WiFi /Bluetooth menu option and pressing the OK button. Select Pair from the Pair/Unpair ABL menu option. A circle will appear around the Bluetooth Icon in the top right corner of the display. Quickly double tap the Bluetooth button to initiate pairing to your scope. You will see that the circle remains filled with color, indicating the ABL is paired. You will also see that the ABL line in the menu now says “PAIRED” to the right.
Your ABL is now paired to the scope via Bluetooth.
6. Zeroing Process
The Zeroing process is the same for the ATN X-Sight 4K, ThOR 4, and X-Sight II HD.
NOTE:
ATN recommends performing this process during the day time. Zero the ABL at 50 yards or further if the red laser is visible to you in the current lighting conditions.
In order to Zero the ABL to your ATN Smart Scope, please follow the next few steps.
Remove the Allen screw that covers the Red Visible Laser. Once the Red Visible Laser port is exposed, proceed to your SMART scope system settings. Navigate to the Profile/ Zero Tab. Using your scope’s keypad and scroll wheel, select Zeroing ABL and press the OK button.
This will activate the Red Visible Laser and the ABL Ranging Reticle in your scope. Make sure you are on a bench rest, and your rifle is stable in a fixed position. Mark your target with the Red Visible Laser. If zeroing with your ThOR 4, place the Red Visible Laser onto a thermal target, and/or something the thermal scope can see. While your rifle is completely stable, adjust the ABL Ranging Reticle with your key pad and scroll wheel so it is aligned with the Red Visible Laser on the target. Once both the Red Visible Laser and ABL Ranging Reticle are overlaid on the same position, Press the OK button to save the zero position. Your ABL is now zeroed with your scope.
7. Controls
NOTE:
Please make sure you have the Advanced Settings option turned ON in the ATN Smart HD scope you are using with your ABL.
You will be able to use your ABL Rangefinder with your scope once paired, and you have completed the zero process. You will now be able to use the ABL with your scope’s internal Ballistic Calculator, by accessing your SMART scope Ballistic Calculator in the Advanced Shortcut Carousel system settings. Please refer to your X-Sight 4K, X-Sight II HD, or ThOR 4 manual for the exact steps explaining how to enter the environmental and ballistic information for your profile setup. Once all those items are correctly setup, press the Function button on your X-Sight 4K or Thor 4. If you are using the X-Sight II HD, tap the Power button to activate the ranging function. Position the ABL Ranging Reticle on target for 5 seconds to get an accurate reading, or, again press the function button once the new range to target is indicated in the upper left of the display to quickly range a target without waiting for the ranging session to timeout.
When you get your range to target, the Ballistic Calculator will automatically adjust your point of impact. Until you reset the range (either manually or with ABL) your shooting solution will be set on the last range used. Simply turn off the Ballistic Calculator and your scope will revert back to your Current Profile Zero settings. To use the Shortcut Carousel to activate the ABL feature, select the FLAG icon.
Now, You are ready to Make Every Shot Count!
8. Two Year product Warranty
This product is guaranteed to be free from manufacturing defects in material and workmanship under normal use for a period of 2 (two) years from the date of purchase. In the event a defect that is covered by the foregoing warranty occurs during the applicable period stated above, ATN, at its option, will either repair or replace the product, and such action on the part of ATN shall be the full extent of ATN’s liability, and the Customer’s sole and exclusive remedy. This warranty does not cover a product (a) used in other than its normal and customary manner; (b) subjected to misuse; (c) subjected to alterations, modifications or repairs by the Customer or by any party other than ATN without prior written consent of ATN; (d) special order or “close-out” merchandise or merchandise sold “as-is” by either ATN or the ATN dealer; or (e) merchandise that has been discontinued by the manufacturer and either parts or replacement units are not available due to reasons beyond the control of ATN. ATN shall not be responsible for any defects or damage that in ATN’s opinion is a result from the mishandling, abuse, misuse, improper storage or improper operation, including use in conjunction with equipment which is electrically or mechanically incompatible with or of inferior quality to the product, as well as failure to maintain the environmental conditions specified by the manufacturer. This warranty is extended only to the original purchaser. Any breach of this warranty shall be waived unless the customer notifies ATN at the address noted below within the applicable warranty period.
The customer understands and agrees that except for the foregoing warranty, no other warranties written or oral, statutory, expressed or implied, including any implied warranty of merchantability or fitness for a particular purpose, shall apply to the product. All such implied warranties are hereby and expressly disclaimed.
LIMITATION OF LIABILITY
ATN will not be liable for any claims, actions, suits, proceedings, costs, expenses, damages or liabilities arising out of the use of this product. Operation and use of the product are the sole responsibility of the Customer. ATN’s sole undertaking is limited to providing the products and services outlined herein in accordance with the terms and conditions of this Agreement. The provision of products sold and services performed by ATN to the Customer shall not be interpreted, construed, or regarded, either expressly or implied, as being for the benefit of or creating any obligation toward any third party of legal entity outside ATN and the Customer; ATN’s obligations under this Agreement extend solely to the Customer.
ATN’s liability hereunder for damages, regardless of the form or action, shall not exceed the fees or other charges paid to ATN by the customer or customer’s dealer. ATN shall not, in any event, be liable for special, indirect, incidental, or consequential damages, including, but not limited to, lost income, lost revenue, or lost profit, whether such damages were foreseeable or not at the time of purchase, and whether or not such damages arise out of a breach of warranty, a breach of agreement, negligence, strict liability or any other theory of liability.
PRODUCT WARRANTY REGISTRATION
In order to validate the warranty on your product, ATN must receive a completed Product Warranty Registration Card for each unit or complete warranty registration on our website at www.atncorp.com. Please complete the included form and immediately mail it to our Service Center: ATN Corporation, 2400 NW 95 Ave, Doral, FL 33172.
OBTAINING WARRANTY SERVICE
To obtain warranty service on your unit, End-user must notify ATN service department by calling 800-910-2862 or 650-989-5100 or via e-mail service@atncorp.com to receive a Return Merchandise Authorization number (RMA).
When returning please take or send the product, postage paid, with a copy of your sales receipt to our service center, ATN Corporation at the address noted above. All merchandise must be fully insured with the correct postage; ATN will not be responsible for improper postage or, missing or damaged merchandise during shipment.
When sending product back, please clearly mark the RMA# on the outside of the shipping box. Please include a letter that indicates your RMA#, Name, Return Address, reason for service return, Contact information such as valid telephone numbers and/or e-mail address and proof of purchases that will help us to establish the valid start date of the warranty. Product merchandise returns that do not have an RMA listed may be refused or a significant delay in processing may occur. Estimated Warranty service time is 10-20 business days. End-user/customer is responsible for postage to ATN for warranty service. ATN will cover return postage/shipping to continental USA end-users/customers after warranty repair only if product is covered by aforementioned warranty. ATN will return product after warranty service by domestic UPS ground and/or domestic mail. Any other requested, required or international shipping method the postage/shipping fee will be the responsibility of the end-user/customer.