![]() Download this manual (.PDF, 0.38 Mb)
Download this manual (.PDF, 0.38 Mb)
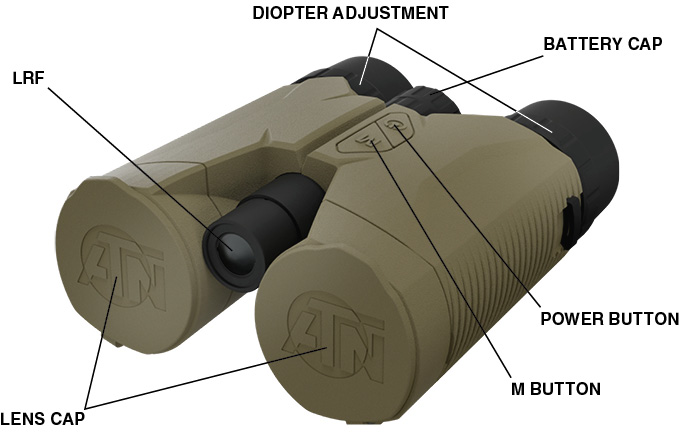
1. Appearance and specifications
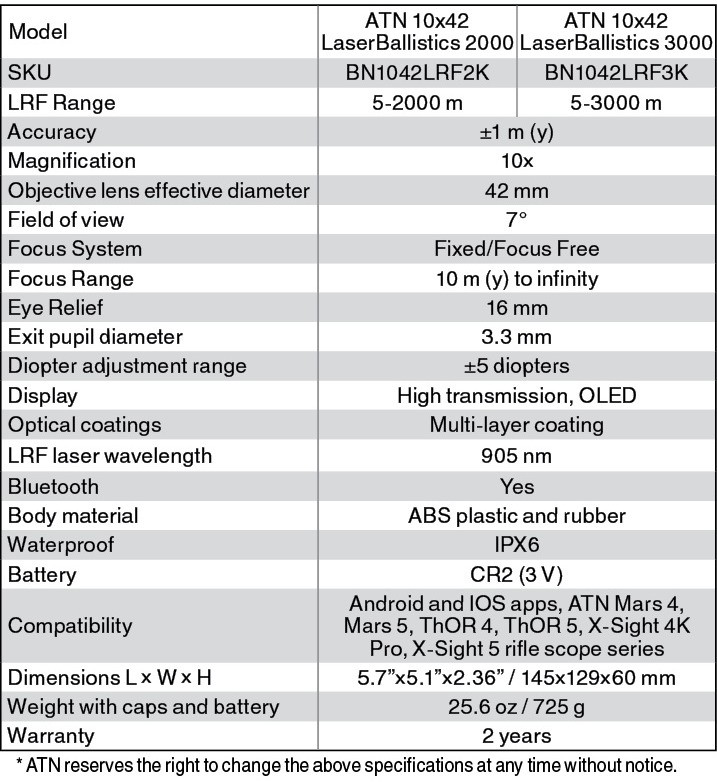
2. Battery installation
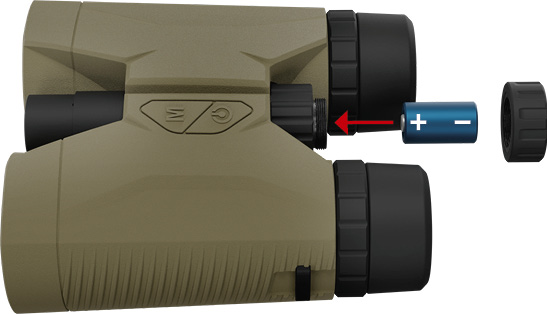
Install CR2 battery as follows:
- Unscrew the battery cap.
- Insert the battery, observing the polarity as indicated.
- Screw in the battery cap until it stops.
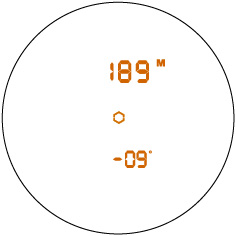
3. Startup screen
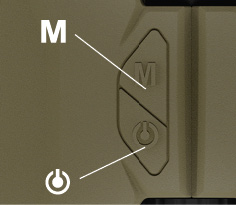
Press the  button to power up the screen.
The screen shows the reticle, where the LRF will perform a measurement, the value of measurement in the selected units on the top and the angle of pitch during the measurement in accordance with the ground.
The binocular performs the first measurement right away after turning on. The hexagonal reticle is blinking to indicate when the LRF sends laser impulses for measurement.
4. Unit conversion
The device has two units of measure options, meters and yards. In order to switch between the two modes, press and hold the M button until the mode changes.
You will see M or Y on the screen to indicate the current mode.
5. Battery indicator
The device has a battery indicator. It will appear on the OLED screen with a battery icon that indicates when the battery charge is low.
6. Controls and modes
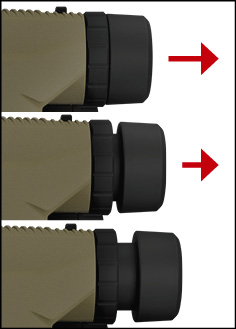
6.1. Eyecups adjustment.
You can twist the eyecups in order for them to extend and retract. They have 3 fixed positions — fully extended, half extended and fully retracted. Set them to the most comfortable position for convenient use of the binocular.
6.2. Diopter adjustment.
The diopter adjustment is achieved by rotating the ring of each eyepiece that is located between the eyecups and the main housing.
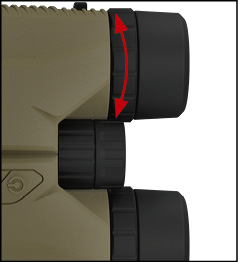
The setting is done for each optical channel independently. In order to set the eyepiece diopter correctly, point the binocular at a distant object and use one eye only. Rotate the diopter adjustment ring until you are able to get the sharpest possible picture of the observed scenery. Perform the same procedure with the other eye in order to set the diopter for the other optical channel.
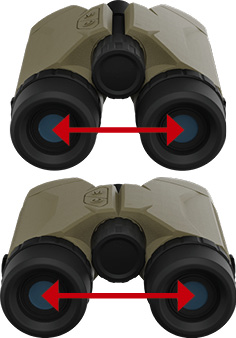
6.3. Interpupillary adjustment
Move the two channels in accordance to the bridge between them in order to achieve the correct distance between the exit pupils that is most comfortable. You will find the correct distance when Your brain is able to combine the two images into one.
6.4. Scan mode
To enter Scan Mode press and hold the power button, while in this mode the rangefinder will continuously measure and display the results and you can pan across different targets.
7. Bluetooth
The ATN 10x42 LaserBallistics (further ATN 10х42) has the ability to connect via Bluetooth to your ATN Smart HD Scope or to the ATN Ballistic Calculator App available in the Google Play Store or Apple Store.
Please visit the Google Play Store or the Apple Store to download the ATN Ballistics Calculator App to use with your Day Scope.
The App name is ATN Ballistics

8. Pairing your ATN 10x42 to your ATN Smart HD Scope
To do this you’ll need to power up the scope and allow it to reach its base reticle screen (home screen).
After reaching the home screen you’ll next press the center (ENTER button) on the scopes keypad, which will bring up the carousel menu.
For 4-th generation ATN smart weapon scopes
(X-Sight 4K, ThOR 4, MARS 4):
- Open the carousel menu.
- Enter System Settings > Settings > WiFi and Bluetooth > Rangefinder > Pair. After you have selected Pair the Bluetooth icon in the status bar in the upper right corner of the screen will display a constantly filling circle around the Bluetooth icon.
- Perform a measurement with the binocular and the inside of the circle will fill with blue color and the status of the Rangefinder will change to “Paired”.
Now the measurements from the ATN 10х42 will be transferred directly to the weapon scope and be used automatically in the ballistic calculations.
For 5-th generation ATN smart weapon scopes (X-Sight 5, ThOR 5, MARS 5):
- Open the carousel menu.
- Enter Settings > Wireless > LRF. Select PAIR from the pop-up menu. After you have selected PAIR, the weapon scope will wait for you to perform a measurement with the ATN 10х42 LaserBallistics and try to communicate the weapon scope. After a measurement is performed, the weapon scope will return to the Wireless menu and will change the status of the LRF to “Paired”.
Now the measurements from the ATN 10х42 will be transferred directly to the weapon scope and be used automatically in the ballistic calculations.
9. Use of ATN 10x42 with Smart HD Scope
The use of the ATN 10х42 with the Smart HD scope is easy.
- Press the power button on the ATN 10х42 to turn it on and activate the laser within the device and begin ranging the target within the hexagonal reticle in the display of the ATN 10х42. In most conditions this calculation will be very rapid and the range to target will be instantly sent to the scope and displayed in the upper left of the display (for ATN smart weapons scopes 4-th generation) or on the bottom middle of the display (for ATN weapon scopes 5-th generation).
- If all ballistic data is correctly entered into the appropriate menus in the scope (see owners manual for scope instructions), the BALLISTIC CALCULATOR feature will automatically and instantly take the new range distance data and move the reticle to the appropriate Point of Impact. Now you are ready to place the center of your crosshairs on the target and fire a shot.
10. Use of ATN 10x42 LRF with the ATN Ballistics app
The ATN 10х42 can also be used in conjunction with the ATN BALLISTIC APP to provide you with the correct turret adjustments needed for a direct hold on target shooting solution with a traditional Day Scope.
- First the app will need to be added to your mobile device. The app can be found in the App Store or Google play store depending on the device type and operating system.
- Once the app is downloaded and installed on your device you can open the app.
- Upon opening the app you may get a Bluetooth permission request. This indicates that Bluetooth is turned off on your mobile device. Selecting yes will turn on Bluetooth on your device and begin the search for the ATN 10х42.
- With the ATN 10х42 in hand, press the power button. This will make the ATN 10х42 available for connection to the mobile device and app.
- You’ll see on the mobile device that the ATN 10х42 is available for connection. Select it from the available devices in the menu.
- Upon selecting the ATN 10х42 from the menu and selecting continue, you will see a new menu on the mobile device containing available profiles. Select the appropriate option for your caliber weapon under “PROFILES”. If the correct caliber is not an option select a caliber you do not have (example: 50 bmg) and you can select the name and change it to your preferred Name/Profile.
- After selecting the profile option, you’ll then select the “CURRENT PROFILE” option to proceed to the next menu. This menu will contain various options for ballistic information and scope turret values. Once these are correctly inputted you can back out of that menu by using the back option on your device. This will bring you back to the previous screen/menu.
- Select continue.
- The next menu will give you options to input the correct environmental conditions. After inputting the correct values, select continue.
- At this point you will see a traditional scope depicted onscreen and numerical values within circle on each of the turrets. When you range a target these numerical values will change. The new values displayed are the turret corrections needed to achieve a hit with the reticle held directly on target.
- Refer to the ATN 10х42 previous section for the proper use of the rangefinder and the options available within the rangefinder.